Search This Blog

Cleaning up the Body work

16th Jan 2010
Having successfully drill the body lift kit for the chassis and body. After a short search of suppliers I managed to find a supplier for the stainless steel bolts I needed to use to bolt down the chassis to the body lift kit and the body online. This turned out to be from a small company called htt://www.seascrew.com/ This company turned out to be the cheapest supplier of these parts and could deliver them to. This was very important as my daily ride had just broken down with a suspected clutch thrust bearing fault.

I knew I would have to take the body lift kit into AC Blasting in Ticehurst to get it blasted and then sprayed with hot flame Zinc and blacked. I would have loved to have took my chassis in and had this Zinc Coated to but new this be to expensive at present. Once the Body Lift Kit was with the plating company I new I could start to make good the underneath and inside cabin area. I took the frame over with a friends chassis and I was told the cost would be £55.00.

I had cut the back of the body down to allow the drag bar to be fitted to the car. This process had not allowed me to totally clean up the rear area as some of the body work was obstructed by the chassis. The areas where sanded with 120 grit paper and the areas of fibre-glassing was attended to so that the strength of the body work was reestablish Fibre-glassing this area was fairly good as I was able to use a new product fibre-glass filler, which allowed the repair to be completed in 7 degree temperatures . Once this had hardened off the areas where coated with gray Gel coat.

Drilling the 80mm body Lift kit

3rd January 2010
The buggy was housed nicely in a friends garage and the snow was starting to flurry when a call came in this morning.

I got to the garage and we pulled the buggy out . I had decided that the 80mm body lift kit would need to be drilled before it was to be blasted and Zinc plated. This meant it had to be accurately positioned on the bare chassis. So that the holes in the buggy floor pan could be marked with a felt pen. This would have been easy if I had remembered to take a felt pen and my friend had not bought some from the pound shop.

We finally found a working felt and marked up the holes after taking measurements across the chassis to ensure that the frame was central. The body lift kit was then removed and the marks were spot marked with a punch and a hammer. I had previously used 8mm bolts to hold my chassis to my body and after a short discussion we both decided that 10mm bolts would be a better bet. new I would need 22 x 120mm x 10mm to bolt down the body through the body lift kit and chassis.

The position of the bolt holes that had been transferred to the chassis where then pre-drilled with a 6mm High Speed metal drill bit at a slowish drill speed.
Once the holes on one side was pre-drilled they where drilled using larger sizes until a 12mm hole was achieved. The body lift kit was then placed back onto the chassis with the body work on top of it so that the holes from the body work could be marked. These were spot marked with a punch in the same manner as the underneath holes. The drilling process was then repeated leaving a hole on the top and bottom of the lift kit. Once this was done the 12mm drill was then used to run through both holes to ensure that a bolt would navigate through.

With the hoes drilled it was noticeable that the body work looked untidy and overhung the body lift kit. The body work was marked were it over-hanged the lift kit . This was then trimmed off by my friend with a jigsaw so that it neatly sat along the inside. The picture to the right shows the underneath of the body work it also shows the areas that I had cut out to fit the traction bar. I would need to finish repairing these areas at a later date.

With the snow starting to flurry harder we placed the chassis and the body back in the garage and turned our attention to the troublesome engine. There was a large amount of power all over the clutch which looked as if the clutch had been slipping. The clutch cover plate was removed by undoing the bolts that run round the outside of it as the clutch pressure plate came of the clutch plate shattered into bits on the ground. Luckily both the clutch pressure plate and the fly wheel seemed to be unscathed with no damage. I asked my friend if he had a bar that we could try to turn the engine over with. Amazingly the engine seemed to rotate. It got as far as the number one firing position on the distributor and would not go any further. Counter rotating it allowed it to turn freely round to the number three firing position. This seemed very perplexing . We wondered if a gudgeon pin had come out. But the real reason probably would only been seen when the engine was took apart. In the mean time I had to get the body lift kit blasted and zinc plated.

New Year 2011 Strip down

2nd January 2011
My New Year started with a vengeance to find the problems that had riddled my project for six months previous thanks to a great deal of motivation supplied from a very good friend and fellow enthusiast. We decided to first of all remove the engine which had been rebuilt some months before and which had seized in the garage as it had been left for too long without engine Oil. The process I had tried to re free the engine had obviously had a toll on the clutch and clutch plate. The pictures show the power that had been worn off the clutch friction plate.

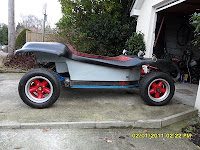
Once the engine was out we decided that as time was available we would strip the Beach buggy right down to its chassis, in an attempt to see if the body lift kit would fit onto the buggy chassis as it had been previously fabricated on a donor chassis.

The strip down was fairly quick and everything seemed to come apart really easily. I put this down to the quality bolts I had used.

First the seats were removed by undoing the four bolts that went through the floor pan. Once the two seats were removed, it was then possible to get to all of the 8mm perimeter bolts that hold the body work to the chassis. As several of these hold in the Roll Bar these were removed also and the Roll Bar was lifted out. The windscreen and bonnet then had to be removed along with the petrol tank.The next problem to get over needed the front lights and indicator wiring to be removed from the Fuse box. Additionally the ignition wiring harness and the brake light and horn wiring all had to be disconnected. The front body mounts could be then removed allowing the body to be lifted off. The body lift kit could then be placed on the chassis to see if it would fit. Fortunately it did the work I had done in the summer was fruitful and the two mated perfectly. With the body lift kit on, the body work was placed back on to see how the ride height looked. The front definitely needed to have the adjustable beam that I had been rebuilding and I felt this would bring the front down so that the front wheels filled the wheel arches once more. The front seats were placed back into the car temporarily so that the seat height could be checked . The raised height was fantastic just what I needed so that a soft top could be fabricated that would not need a head hole for my head to poke through. A shopping list was then made to acquire longer bolts some and a new 9mm drill so that the body work could be fixed back onto the chassis. As I had taken the body work off I felt that it was in need of a clean up and thought it would be a good idea to fibre glass the areas properly from the underneath where I had cut out the areas for the cross bracing in the rear.

With the bodywork back on it was apparent that the Roll Bar would be very much higher than it needed to be. We found that it would just fit snugly inside the body lift kit. This would allow it to retain its height and could be bolted through the the Roll Bar and the side of the Body Lift frame. This had the advantage of making a strong structure that contained the people sitting in the beach buggy.

It would be some time before the car was back in one piece again.

New Year Move

31st December 2010
The last year has been filled with family problems that will not how ever much I try see to get them resolved. This has had a major affect on my motivation and the time I have spent on my project as of late.

I was very surprised to have a knock on my door two days ago when a really good friend came round to see which rock I was hiding as he not seen me for a long time. It was soon discussed that I could move the buggy from my garage to another nearby making it easier to work on it. My friend said he would help me move the Beach Buggy and today this actually happened.

I am quite excited about some of the things that where discussed and hopefully 2011 will be a more interesting year.

GOD BLESS YOU JOHN

HAPPY NEW YEAR EVERYONE

Final Suspension parts

12th October 2010
With this month full of planning for my daughters birthday there was not a lot of time spare to work on my Buggy, this was compounded as it was the traditional bonfire season in the UK. The reality of this was that there was very little that I could do.

I did however locate and purchase some front suspension arms. These were obviously mucky and in much need of restoration. I would have to renew all the ball joints. Which meant I had to get the old ball joints out. I had spent some time on the Internet researching different methods for removing the ball joints but had found none that I felt competent with, that would not damage the arms.

I started the clean up operation by scrapping the mud and soil debris from the arms. I then used Gunk to clean the grease and dirt from the arms.

Collecting Parts

10th September 2010

Not much has been done to the buggy since the body lift kit was made for it. The family issues I had been experiencing had distracted me from my buggy. Instead I have been collecting front suspension parts as I new the body lift would require the front suspension top be dropped. I purchased a new beam from eBay which had been already reconditioned. I also bought a set of new spindels with a 2/1/2 " drop on them as I felt the best solution to this was to make up an entirely new front beam and then sell the old one off afterwards. I also bought some second hand control arms but have been experiencing problems getting them shipped from the seller due to the seller not providing information for the courier. I hope that this will be sorted shortly.

I still needed to resolve the problems with my engine and it was clear to me that it would have to come out so that the problems could be resolved. This was something I seemed unable to gather energy for at present.