Search This Blog

Showing posts with label fibre glass. Show all posts

Increasing the hieght of my GP side pannels by 80mm

19th April 2011
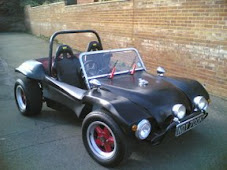
I decided that after working on the bonnet of the buggy so successfully I would increase the height of my side pods myself.

I have also noticed that this month we have reached 11,000 visits which was fantastic. Please comment or follow this blog by clicking the follow button in the right hand side if you like my blog to give me feedback.

I decided the best approach to this was to use a marking gauge to mark off 15mm along the bottom edge of the side pod. I then used an angle grinder with a thin cutting blade to cut of this section. I made pieces of wood up to space the 80mm gap for the new height, this was checked again along the whole length of the cut before I started to fibre glass up the gap.
I used a piece of plastic cable trunking to span the gap I cut this out of a 4" box so that I just had a flat piece from the side and laid it into the gap using resin to adhere it. I then used fibre glass matting to cover the whole area on the inside of the side pod. This made a very strong joint which enabled me to remove the pieces of wood I had used to separate the two sections. I then used more plastic I had cut out of the box to make up the inside where the pieces of wood had been. You can see from the picture right that this made the side pod rigid especially when the side pieces where fibre glassed in place. The surface of the side pod now had a channel running through the front of it. I couldn't make up my mind what to do with this channel but for speed I used fibre filler P40. to fill the gap up . I had previously used this with good results and found that four 600ml tins was just enough to fill the two channels on both side pods. The picture right shows the channel filled with p40 and the reverse side of the other side pod fibre glassed over the plastic cable conduit. The P.40 had filled the gap nicely , however it gave a very ruff surface . This was rubbed down with 80 grit sandpaper to bring the surface back to a flatter finish . I then used p.48 body filler to fill the surface of this area. You can see from the picture that the side pods are starting to take shape . More sanding was then required to flat off the surfaces. When I was reasonably happy with the outside I painted the inside of the side pods with Hammerite Hammered black paint. This I had found was quite durable and made a much cleaner finish. I then sprayed the outside with High build 2K UPOL Primer filler using a friends professional spraying workstation. I hoped this would be powerful enough to spray the whole car

Next time I would need to paint the body work.

Bodywork improvements - one

30th January 2011
The last day but one of January brought temperatures of 2.5 degrees outside and I knew i had a lot of fibre-glassing to do, which I knew would not be easy to achieve at these low temperatures.

The body work was starting to come along as it was slowly being rubbed down. I had always new that the design of the Fibrefab SWB Rat was very light and that some areas moved when the car was on the road. The worst of these was the front wings and headlights. In addition people for some reason think they can sit on car wings which on this type of buggy is not possible as the wings are not strong enough. With this in mind I had decided that with the body work off I could manage to build a mount that would hold the wings more rigidly. I bought some stainless steel fastenings from an online store these at first seemed difficult to locate as I new i wanted to fibre-glass a block of wood into the wing with some hidden bolts to mount the frame support. The main problem with this is that it is very difficult with a hidden bolt to stop the head spinning when you tighten it. I located some coach bolts that had a square on the underside of the cup. along with this I found some bar that was drilled with 8mm holes in a chain, 205 mm long and 19mm wide. I found that I could make these holes square with a file so that the head of the coach bolt would be captivated in it. I also bought some oak that was wide enough to take a channel to sit this metal work into. I used a router to cut this channel and assembled the two fixings easily. I used a DA to clean the underside of the wing back to the fibre-glass. This would provide me with a location to bolt to on the underside of the wing. I used hairy fibre glass filler to bond the wooden anchor points onto the underside of the frame. After bonding the wooden anchors on by filling the groove up with filler and then mating them onto a bed of filler I managed to build up enough hairy filler to make the bracket slope into the underneath of the wing. I had nearly completed both anchors when I realized I was running out of filler. I would have to wait for this to dry and purchase some more filler to complete smoothing them into the wings.

With the body work upside down I also noticed that the underside of the shell did not mate as well as it could do. I used the the body kit frame on the underneath of the body to improve the angles of the back transom. This was really a try bit by bit operation , which |I must confess was a little easier than mating it to the chassis. used the DA to cut the body work down . It was to high were I had made it up with fibre-glass and improved it significantly by this trial and error approach. There was some areas that needed making up with 5mm of filler so I knew my visit to buy more fibre-glass filler was going to have to be very soon.

With the 1.8ml tub of Fibre filler purchase I started work making up the back section . I knew this was going to be an overnight hardening process so set about making good with the filler using a straight edge to ensure the angles where good and straight . I also filled the center area so that it could be cut back to fit the body kit tighter. You can see the result of using the fibre filler really improved the back section. The drying time for this filler is usually 20 mins and I new as the temperatures was very low that there was not much chance of this drying other than over night.


The next morning I returned and applied more fibre fill to the front wings to smooth out the wing around the mated on block. I built up the edges with fibre fill so that the gradient between the block and the wing was smooth making the block disappear into the fibre glass wing. I new this would take a long time to dry out so left the fibre fiiller over night to really harden up. The smooth finish I would need to coat with a skin of fibreglass mat to seal it in from the weather. I new that the filler would need to harden off and that it needed to be totally dried out before this was applied.

Body work and Gel coating the rear seating area

18th November 2009
Since making my rear body support I had noticed that the rear seating area that it attached to on the left side was not allowing it to sit straight. This was mainly caused by the fibre glass seat area work that I had undertaken in Mad March affairs with the CSP Torque bar installation and rear body modification but not been able to get access to. Luckily with the engine still out I was able to dismantle the body support and the torque bar to give access to the area under the seat. Where I had moulded the shape on cardboard sections there had been some seapage underneath that was obstructing the off side body support bracket. I used a rotary disk sanding attachment for my drill with an 80 grade disk. This cut the area back so that it was in line with the bottom panel. The process was slow going but rewarding as it gradually came back in shape.

The next problem was going to be how to remove the gel coat from the areas where I wanted to fibre glass were they were very close to the chassis or suspension. I had to think about this as I didn't want to spend a lot of money buying a Black and Decker rotary file. I remembered using a carpet layers knife in the past and set out to see if I could find one to see if I could cut the old gel coat off in slices.

When I cleaned up the left hand side I noticed that the bracket came back into orientation. I had to fill the holes I had made to mount it originally, I cut the surounding area down with the rotary sander from both sides and re fibre glassed from both sides to make a strong bond and re drill to bolt to its new location.

I was going to try to get my grey gel coat in a jar from the last place I got it made up a small fibre glass company. Unfortunately I believed they had moved on so a new search was on to find another company that would be so reciprocating. The red I thought would only come from one source as its not used commercially or so I thought. Luckily a search using the Yell search engine provided me with a surprise that the company Castle Mouldings I had purchased the original gel coat was still trading and would happily still sell me gel coat. This was great news and the gel coat was applied using a brush to the new fibre glassed panels. The red was quite a bright colour and hoped that it would merge with the existing coat overtime as the grey had done some years previously. I used about 5% catalyst with the gel coat as it was quite cold . I mixed up the grey gel coat and coated the underneath of the seat area. Some of the underneath was not accessable and I new I would have to attend to this at a later date. After considering the areas I had gel coated I decided to cover the whole rear seating area. The fibre glassing work that had been done on the underneath of the body whilst on the car had not been done as neatly as I would have liked with the body removed. I am hoping that at some point in the future this can be re addressed.

I also managed to sell my twin manifolds and linkage kit I had bought prior to deciding to go turbo. This was going to be helpful as I hoped it would allow me to buy an inter cooler for the engine. The search was now also on to find one. I was not sure after searching through the classifieds online whether this was going to be easy.