Search This Blog

Installing a new VW Fuel Gas tap kit

9th October 2006.
I had been trying to work out why my fuel supply to the twin IDF 40 Carbs was so poor. This was especially odd as I had replaced the normal fuel line with 1/4" copper gas type pipe. This in theory should have given a substantial difference in the fuel delivery, however there still did not seem to be a full filter of fuel and whatever I set the fuel regulator to there was no difference in supply.

My first thoughts were that the fuel pump might be failing. This was soon dispelled as removing the pump and checking the pump diaphragms gave no indication of holes or pump problems . I assembled the pump and turned my attention to the consideration of the matter further.

With the pump functioning OK and the fuel line having just been replaced the only other solution had to be something to do with the tank. The tank had a air feed built into the design so I new that it could not be causing a vacuum in the tank which would cause fuel starvation.

The only other possibility was the fuel gas tap on the bottom of the tank. I had repaired the tap before putting it back in the car and had re-used a piece of gas pipe 1/4" and soldered a washer onto the outside so that it would lock against the nut. I had also placed the old filter onto the tap. I removed the tap from the tank and found the cause of the problem the old filter was so full of rubbish that it was partially blocked. I would have to purchase a new one.

I found a new one on eBay at the amazing price of £2.50 and bought it on a buy it now price. The item fitted the tank perfectly and this seem ed to clear up the problem of the fuel feed. The filter obviously was so blocked that it was restricting circulation.

Installing OMP Seat Sub Frames

7 Nov 2005.
The OMP seat sub frames where constructed from two aluminium right angle s and four aluminium posts each had a series of different bolt holes to take the supplied bolts. I had additionally purchased an OMP sliding mechanism for the seats, which would allow the seats to move forward and backwards when in situe. It was clear early on that the original seat runners were in the way and would have to come out. The only questioned seemed to be how? Without having any gas cutter in the garage the only other option seemed to be an Angle grinder. I ensured that the brake line on the drivers side was tucked up and away from damage unclipping it through its section. Always ensure you use protective equipment with an angle grinder leather gloves , ear defenders and glasses are a minimum as this is a very confined area and the sparks from the steel bounce around the body. It is also quite helpful I have found in the past to have a fire extinguisher close to hand.

I started by using a metal cutting disk to cut off the majority of the seat runner. A new cutting disk gives quite a good bit of reach and working eliminating section by section you can gain access to other parts that are hard to get the grinder into.

The next section is the arduous one. It took about a day to grind the rest of the material out and off the chassis. It is also important to stress here that even if its a sunny day when doing this ensure your skin is covered, my girlfriend said she was finding small lumps of metal in my necks for months afterwards.

Two days later and I had removed the seat runners from the floor pan. I had not envisaged how strongly they had been attached, this was something to remember when fitting the new sub frames.

With the runners removed the area was painted in red oxide paint and then a gray primer. The heat transfer through the floor pan had removed the paint from the underneath as well. This had to be cleaned up and was painted the same as top. A top coat paint was added and the runners looked like they had never been there.

The new OMP runners seemed very odd in construction as all the pictures I had showed the alluminium posts facing downwards. This meant that they was impossible to fix to the seats and I soon realized that they were shown in the pictures upside down, after figuring that out they bolted together very easily, there were some questions about the heights of the posts but I figured out the best method was to bolt everything onto the seats and they try fitting the seat/OMP Runner into the floor pan area. The Area is quite tight and you must pay attention to the brake line that runs through and along the tunnel. The Seats needed to be placed quite far back as I am 6ft 2" and the rear inside post needed to be shortened to allow the seat to fit into its proper positions. Unfortunately I felt it necessary to shorten the front posts as well as I was not aware that a reclined seat position would give better control of the vehicle. This would mean I need to revisit the seat installation at a later date when I had purchased another set. In the mean time not knowing this vital information The seats bolted in solidly with a large metal washer on the other side of the chassis.

Parts Used:
OMP HC655 Seat Runners
OMP HC654 Aluminium Seat Subframes.
M8 x 50 , 8.8 Gauge Stainless bolts and nyloc nuts.

The new garage

1st Nov 2005
The garage in Bexhill was much smaller than the garage that I had been working in as it was a single garage and I had been working in three. However it was a very appreciated new home for the buggy. I had been used to a work shop were I could cut/grind parts to fit the buggy fortunately the buggy was shorter than the garage and this meant that I had room to construct a work bench.

I built a work bench by firstly fixing three over sized shelf brackets to the rear brick wall. I had found a piece of wood 3" x 2ft x 4ft The (sorry imperial measurements) wood was going to be the surface of the work bench. It was soon obvious that I would need to support the front of the bench. I purchase two 4" x 2" x 5ft timbers and cut these to fit under the front of the bench. This strengthened it up and made it solid. I was then able to fit the vices to the work bench and the garage was ready to go.

My new mini crystal halo halogen headlights had turned up during the move on the 28th Oct 2005, So I was eager to see what they looked like fitted. I managed to get them fitted quite easily but would have to wait for another day to do the wiring.

I transported the OMP seats down with the buggy and they sat in the car whilst I tried to order the OMP seat rails.

My move had been successful and I had moved house and relocated.

Selling up the bits and bobs

Items that sold out of the garage

These items where sold on eBay shortly after the low loader was booked to move the buggy to its new garage in Bexhill. The items went to a man that drove down from North of London . I hope he enjoyed them.


some items did not sell
The old brake drums and spindles where not sold on eBay even though they where in very good condition. They where dumped in the local dump as not one bid was entered.

The Moving day

26th October 2005
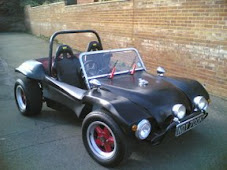
The buggy was moved to a different garage in the Bexhill area on the 26th October 2005. I had succeeded in some of the goals but failed to get the buggy finished by the deadline of the move. In three months I had managed to get the chassis cleaned up and fitting the chassis. I had wired enough of the ignition system to enable the car to propel itself with a speedometer and rev counter working. Some items were still out being finished. I had taken the windscreen to a cleaning company after getting a friend to weld the holes in it up. It had not been returned and I knew that I would have to pick it up after the buggy was moved.

I was very pleased that the chassis was now rolling as it could easily be positioned onto the low loader that I had organised to come today. There was two weeks left before we finally moved and this was a huge hurdle moving the buggy out and leaving about two weeks left for me to pack. I new that I would have to pack solidly for two weeks to ensure everything I had was packed into cases. I had purchased the seats but had still not managed to fix them in place so I used the Child's car seat again to sit and drive the buggy out of the garage. The buggy ran out of the garage and I parked it on my driveway so that I could clear the garage. three months of fibre glassing and general car workshop 101 had left the garage needing a tidy up. Additionally this gave me the option to ensure that nothing important was going to be left at the old site.

The low loader arrived at about 9:00am and I was happy that my partner had stayed over to help with the move I asked her to take some pictures of the move and I gave her the camera for the day. I ran the car out onto the road as the low loader was unable to fit through the drive way entrance. I had inadvertently given her the camera knocking the automatic switch off its setting therefore the pictures are all a little over exposed. The buggy was wheeled up onto the ramps of the low loader and with its wide gate just fitted across the low loader. It had not gone up quite straight so I had to push it over on the back of the lorry with the driver. The buggy was secured to the low loader over its axle with large straps running under the lorry. I loaded the tool boxes onto my car and we set off to the new garage. I was glad that I had had time to clean out the garage as I would not have time in the following two weeks to get back to it as my packing schedule was already fully booked.


We followed the buggy all the way down to the garage it was some 15 miles or more and we both watched eagerly as the buggy wound its way through the lanes. I new I had more time to get the car on the road as the garage was going to be a new work shop. My father had been finally diagnosed as having cancer of spine and he was getting regular treatment. It was possible that I had a new alarm clock and surely would be able to get the buggy on the road from the new garage.

http://www.youtube.com/watch?v=2Ugpmx0N8RQ

Fitting of the petrol tank.

One day later.
The tank arrived finished a day later pictured left. It was cleaned up and hot flame zinc sprayed all over with a non corrosive finish. I was happy with the item especially as I was told that there where some holes shown up by the blasting process. These had been welded by AC Blastings and then the zinc spray finish had been applied. I expected the tank to fit straight into the chassis but was surprised to see that it hit the lower steering column and would not sit in its location flush. I had made some adjustments to the tank before sending it away. The GP manual states bash it with your largest hammer, I would suggest get really annoyed then take your largest hammer to it. Obviously you need to find a hammer with a good round surface something like a ball pane hammer. It is best to use a plastic one as you will find that it will not mark the tank so easily and leave a finish somewhat similar to panel beating. The process involves a lot of trial and error and finding the amount the tank moves each time it is hit . I had to ensure that the tank had at least an inch of free space. After an afternoon of hitting the tank and several beers, the tank eventually took shape and fitted.

The tank was bolted in with two bolts either side of the tank through the fibreglass. The front of the body work was situated at least 4" above the front beam axle. The tank sat just above this and it looked as if a bracket was needed to take the load of the tank onto the front beam axle. The GP manual states you need to make up two Z shaped brackets and they need to be bolted onto the front beam body mounts and then onto the bodywork. I decided that it would be a better solution to create a long beam with z brackets underneath to spread the load of the body and provide a stronger anchor point for the tank.