Search This Blog

Fitting of the petrol tank.

One day later.
The tank arrived finished a day later pictured left. It was cleaned up and hot flame zinc sprayed all over with a non corrosive finish. I was happy with the item especially as I was told that there where some holes shown up by the blasting process. These had been welded by AC Blastings and then the zinc spray finish had been applied. I expected the tank to fit straight into the chassis but was surprised to see that it hit the lower steering column and would not sit in its location flush. I had made some adjustments to the tank before sending it away. The GP manual states bash it with your largest hammer, I would suggest get really annoyed then take your largest hammer to it. Obviously you need to find a hammer with a good round surface something like a ball pane hammer. It is best to use a plastic one as you will find that it will not mark the tank so easily and leave a finish somewhat similar to panel beating. The process involves a lot of trial and error and finding the amount the tank moves each time it is hit . I had to ensure that the tank had at least an inch of free space. After an afternoon of hitting the tank and several beers, the tank eventually took shape and fitted.

The tank was bolted in with two bolts either side of the tank through the fibreglass. The front of the body work was situated at least 4" above the front beam axle. The tank sat just above this and it looked as if a bracket was needed to take the load of the tank onto the front beam axle. The GP manual states you need to make up two Z shaped brackets and they need to be bolted onto the front beam body mounts and then onto the bodywork. I decided that it would be a better solution to create a long beam with z brackets underneath to spread the load of the body and provide a stronger anchor point for the tank.

Cobra or OMP Seats

One Day later.
I found what I thought where Cobra 4x4 seats on eBay. They where located in the basement of a shop in London as they had been used once for a display. They turned out to be OMP seats , which where Italian in origin and very similar to the Cobra ones. The mounts where slightly different as they bottom mounted. I arranged to go up and get them and brought them back. I decided to try to convert the existing seat mounts by getting hold of two seats and converting the seats into seat sub frames. The process involved trying to brace the runners so that they where parallel and would not move the seat structure could then be cut away with an angle grinder and a rigid frame could then be welded onto the runners to allow the seat to be mounted.

I had made one up showing my friend Ben the process he set about using the angle grinder and the welder for the first time. He did a fabulous job pictured right.

The process seemed simple enough to do but initial testing showed that the seats that we purchased could not have fitted as after the process the bars where to tight to work or be usable. Both seat runners one made by me and one by Ben did not fit it was obvious that I needed to buy the OMP runners that matched the seats and cut the old runners out of the chassis.

Paint

Three weeks before we moved.

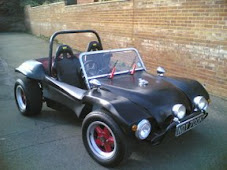
The clean down of the underneath of the chassis went quite well and was achieved with 160 sanding disk. the resulting finish was a little colourful in the picture opposite, but this picture does not only show this. During the clean down several bits arrived back from the blasters 'AC Blastings' The Roll Bar and the front bumper were tested for fit so the body had to be transferred back onto the chassis for alignment purposes. The buggy body was then removed and the rest of the bottom was finished returning it back to the fibreglass. It was then painted all over with a combination of Gel coat and other chemicals which would allow the Gel coat to set without being inside an air tight wrap. The finish provided a clean gray colour. next the body work was prepped, primed, and painted with spray cans. This was intended as a sealant to the bodywork that would last until the finances for a full respray was available. The finish came up pretty good considering it was sprayed by unconventional means. Obviously it did not have the high gloss finish that comes from two pack paints but it gave the project a more finished appearance that pushed the build on. The dash board was also Gel coated and then primed and sprayed. Once the paint was dried the parts where re-assembled and the bonnet was primed to be painted. The buggy was starting to become mobile and was now a rolling chassis. I was starting to see what my dream may look like. The final paint was applied to the bonnet and the paint work was finished. The bonnet had not been fixed in place as the tank was still at AC Blastings being zinc coated. This was necessary as the tank was showing some signs of rust and I wanted to be sure that the tank would not leak. Would the tank come in time and fit correctly so that the rolling chassis could be moved.

Redline Linkage Saga

Wednesday July 2005
My Redline Linkage kit was on order from Weber I was excited about receiving the new one as the old linkage kit transversed the floor of the engine compartment. This used a poor bolting system to bolt a vertically mounted bearing. Pulling on the throttle would pull the vertical bearing over making the accelerator stay depressed. Clearly this was a poor design and the Redline one transversing across the carburettors was much easier to set up.

The kit I had purchase came with the manifolds as part of the kit so I removed my manifolds that where short and touched the exhaust and replaced them with the Redline ones ensuring that the gaskets where seated well. I replaced the carburettors ensuring that the gaskets where oiled before the carburetors where seated onto the manifolds. The linkage kit was next and the top bar went on easily. However for some reason the linkage kit was too long to fit.

In error I tried to shorten them believing I could re tap the threads. This in theory was not so bad if I had picked the correct end to shorten. Opposing ends of the bar had left and right wound threads so that you could twist the rods to increase or decrease the bars length. I picked the left hand thread to shorten and only had a right hand tap to re- thread. As you can imagine this did not work at all and left me with a problem . My new linkage kit was lacking a vital part.

As luck would have it I searched Yell for a company that produced these ball joint kits. I found a company that produced them in my locale and telephoned them. They had moved north , but where still willing to help supplying me with lockable ball joints that could be removed whilst in situ. I was fortunate as this error cost me only £30. An new linkage kit would have been much more expensive.

The lockable ball joints turned up two days later they where exactly the correct length and with the quick release system fitted in about 2 minutes by removing the little wire and swinging it out and removing it to release the ball. The difference was amazing they took up all the slack in the system and allowed the linkage kit to be calibrated evenly.

The engine was turned over it started and the engine ran beautifully. I wondered what the chassis /engine ran like. Several moments later I figured out that the engine could be started with a hot wire and the steering could be fitted to give some ability to steer the chassis. This coupled with a lawn mower petrol tank we where using and a child's car seat. The Chassis was finished and mobile! The chassis was very light and with no weight in the front the 100ft drive way was used most of the rest of the sunny afternoon driving backwards and forwards up and down the drive. This was the first real time test of all the components on the chassis. The braking component worked fine in fact the front was so good it seemed to lock up easily. The engine provided so much power it was easily able to push the front wheels off the ground. By the end of the day I was smiling from head to toe and covered by a huge grin. I was amazed that the project was looking so good. I had finished prepping the chassis and was trialing fitting of components in the tub prior to a quick respray.

The Texas Connection

With the bodywork alterations and preparation well under way I was looking on EBay for a twin carburettor system that would fit on the buggies engine. The single draft 40mm Weber that was fitted just did not have the performance that I required from the buggy. I decided that I could sell the manifold and carburettor on eBay and raise about £100-£150 towards the cost and was hoping as I had been watching the prices of the twin Weber IDF 40 systems go up and up as they where selling for about£600.00 at that time that I would be able to find one that was suitable for the 1600 VW flat four engine. I hoped there was as I new from research that the addition of two carburettors to the engine would provide a better performance. I checked and double-checked the information needed to jet them:


The 40IDF sizes required for the carburetters where:
Venturi: 28mm
Main Gas: 1.30
Main A/C: 2.00
Emulsion Tube: F11
Idle jet: 0.55
Pump Jet: 50.

Armed with this information I was able to look for my Carburettors. After some time a match came up but it was not in England it was in Kentucky, Texas. I placed several bids on the carburetors, manifold and linkage kit. The auction eventually ended and I had won them. They took nearly two weeks to arrive and where not delivered to my house because of customs duty. There was approximately £80 of duty that needed to be paid on pick up of them. Even so this was not bad, as the carburetors had cost me £555.00 in total.

The day the carburetters arrived I was happily installing them after cleaning them thoroughly with carb cleaner. The engine would not start and the accelerator pump gaskets where leaking badly. I contacted the Weber dealer in my area and arrange for two new accelerator pump diaphragms to be sent to me by next day delivery.

The new accelerator pump diaphragms arrived the next day and I oiled the diaphragms and placed them in each of the carburettors. This stopped the pumps from leaking and the engine would run only if you pumped the accelerator. I had a blockage somewhere in the main jets.

Luckily I found an article on http://www.superbeetles.com/performance101/jun.htm
that talked about setting up Weber carburetors. After reading this and the following article:
http://www.superbeetles.com/performance101/jul.htm . The articles where very interesting as they talked you through setting up the carburettors.

After following the articles I was ready to try again and installed the carburettors onto the manifolds. This time I had also replaced the manifolds oiling the gaskets at all the joins. There was no improvement and I was very puzzled. I took the Carburettors off and took them to a friend who was also a performance car mechanic. He said that the carburettors typically Weber's had very small ventri in the body work of the carburetor and sometimes these get blocked. A week later and 4 tins of Carb cleaner he brought them back and I re-installed them. They fired up beautifully and the engine ticked over.

It was soon noticeable that the carbs where sitting almost on the exhausts. This was potentially boiling the fuel in the Carburetors. The only option was to purchase the Redline Weber linkage kit and manifold kit.

Body Check

Friday.
The first trial of the body fitment onto the chassis came as a bit of a relief, time for a beer and to see what the buggy would look like with the new wheels. The bonnet petrol fuel position had been altered so that it was in the middle of the bonnet.

The trials of the previous weeks had begun to show some clearer images of what the buggy was going to look like. What my partner Catherine had seen several weeks before in my garage was starting to take shape and for the first time everything was steaming ahead.

The body work holes where drilled through the chassis to provide bolt holes with which to bolt the body onto the chassis. The original channel washers where cleaned and painted and used on top of the fibreglass and a 8mm stainless bolt with nyloc nuts.

It was time to start looking at cleaning down the paint from the body work and the interior components like the dash board, bumpers and roll bar.